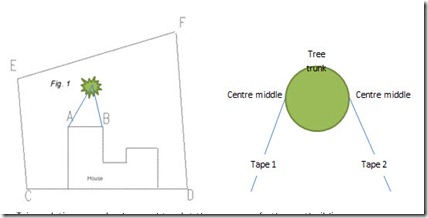
Triangulation involves taking two measurements from fixed corners of the house - to the point that you wish to plot. In this case, we will use points A and B as shown in figure 1 for our fixed points.
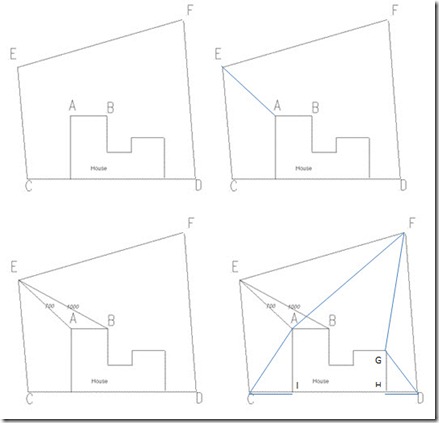
Now, we need to find points E and F and, to do this, we need to triangulate. Take a measurement from point A to point E and another from point B to point E. (Figure 3)
In order to plot all four corners we need to know the following measurements
A-E B-E
A-F G-F
G-D H-D
A-C I-C
Top Tip: The bigger the triangle the more accurate the measurement. Therefore triangulation AF-GF will be more accurate than AE-BE because the triangle is bigger. (It doesn’t matter that A & G are not a straight line)
Remember: That you need 2 measurements from the house for every corner you plot. It’s very easy to forget to take one measurement and this could result in you having to drive make to the site just to take one vital dimension. I always draw out the triangulation line on my rough sketch of the site to make sure I have all the measurements I need before I leave.
You can also use triangulation to plot the position of trees and other elements in the garden. See diag. below. When measuring a tree you run each tape to the ‘centre middle’ rather than to the front of the trunk (see diag. below) as this gives a more accurate reading.

Triangulation can also be used to plot the corners of other outbuildings garages and even the centre of drain covers so it’s probably the measurement designers use most, when surveying a garden.
MEASURING YOUR GARDEN: OFFSETS
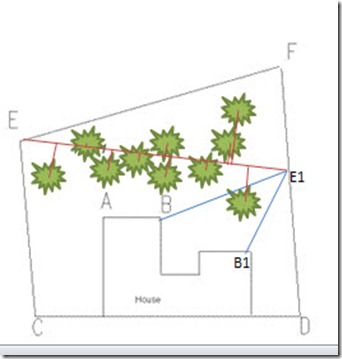
There is one more measurement that is useful for the garden designer and that is called offsets. Imagine for a moment our garden, instead of just one tree had a small wood.
You need two tape measures for this. Lay one along the ground between two known points i.e. E - E1 If you don’t have two easily identifiable points, you can make them up, then triangulate their positions e.g. point E1
Then with a second tape run a measurement back from each tree to the tape on the ground making sure you meet the tape at 90° then record the measurement from the tree as well as the point at which the two tapes meet (see red lines). In this way you can quickly measure many trees using a whole range of offsets.
This method is also useful for measuring curved flow beds. Set up your tape close to your flower bed along the ground and plot the position of each end using triangulation. Then take a measurement at 90°along the tape every 2-5m back to the flower bed and record the distance. When you get back to the office, you can mark off the points on your plan then join up the dots like dot-to-dot picture to get the shape of your curve.
The same approach can be used for measuring curved walls/boundaries.


No comments:
Post a Comment